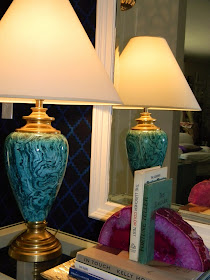
No video today, I'm feeling a little under the weather. Sorry. But I do have a step by step how to on Faux Malachite. I know I was going to do Tortoise Shell, and I will, but I feel crappy and malachite lamps just sounded better. So lets get started.
First go find something to turn into stone, I had these "totally awesome" 80's lamps with super cheap lacquered brass.
But you can do it on anything, check these chairs I saw on Parlour the other day...
If I had a pair kicking around, I would have done them too. For now, back to the lamp...
Base coat with a pale blue/green. I only needed a small amount so I picked up a tester of Glidden's G14- Almost Aqua for $1.99.
Next mix 3 parts glaze with 1 part paint. The paint needs to be a deep emerald green, similar to Ben Moore's 2049-10 pacific sea teal or 2051-10 yukon green. Do a test patch. You may want to add some black to darken, or tint it in either direction with blue or yellow to your liking.
Start by brushing on an area, and quickly removing it with torn pieces of cardboard. Practice this technique first before heading straight to your project. You'll want to look at some malachite and mimic the wiggly curves. You can also use a fan brush for this technique. ( I just couldn't find mine.)
Keep painting more glaze on and removing...
Next you'll want to soften the hard lines and thick edges. Using a brush, lightly stipple or tap the surface to flatten and soften...
Let it dry. I wasn't thrilled with mine, so I lightly rubbed some green glaze over the whole lamp to deepen it a bit. Next coat with a high gloss varnish. I gave mine 2 coats of a spray lacquer.
A little trick to tone down cheap laquered brass...
I use this product. I just brush a little on, and stipple it out to give it more of an antiqued gilt look.
And that is it. Just one more lamp to go and my entrance has a new set of lights.
Not sure about the shades though, they might need a makeover too.
I'll be back when I feel a little better.
Have a great rest of the weekend.


Wow, it is so cool that you made those...looks great ! Would love to see the tortoise as well!!
ReplyDeletexxLily
goldandgray.blogspot.com
Wow girl those look pretty f****** awesome. The lamp shades aren't that bad I kinda like them. I have the perfect lamps for this but I covered them in marble paper damn it. I might rip it off and do this instead. Hope you feel better.
ReplyDeleteholy jeez. wowza. i can't believe this was done by hand.
ReplyDeletefeel better; i'm battling something icky too.
BLACK lampshades!!
Ooooooo, this is so pretty! You are seriously talented! :)
ReplyDeleteThey. Look. Awesome! I agree - black lampshades with gold inside.
ReplyDeleteThank you SO much for doing this tutorial as I've been dying for some malachite!! Now to find the proper candidate. I was thinking of doing a lidded box, but this lamp may have changed my mind.
that is AWESOME. I have a lamp in my car that was on it's way to goodwill. I may need to bring it back inside!!
ReplyDeleteLooks great!!! I can't wait to see the tortoise tutorial. I have a console table I've been sanding and getting ready to try a faux tortoise finish on!
ReplyDeleteThese look fan-freakin-tastic. Thanks for the DIY on painting malachite, I will totally be trying this...on everything I can get my hands on!
ReplyDeleteYour paint skills are amazing. I would've never thought of doing this.
ReplyDeleteUm, as always, I am BLOWN AWAY!
ReplyDeleteThe first shot here looks like an inspiration shot, not the "after." Great job.
Hope you feel better soon,
Heather
Really? So genius! I love those chairs and your lamp is AWE.some!
ReplyDeleteI bow down to you. Amazing. Feel better :)
ReplyDeleteHappy Monday! Hope you are feeling better. I'm passing on the Stylish Blog Award to you :) Stop by and see my post today for details.
ReplyDeleteYOU ARE A GENIUS! Yes, that deserved caps! And I agree with Bri, the lamp shade works.
ReplyDeleteJust brilliant! Thanks for sharing...will have to try this asap!
ReplyDeleteYou make it look so easy I can't wait to try it- I've got the perfect lamp in the basement! Thanks for the inspiration.
ReplyDeleteSo cool - is there anything you can't do??
ReplyDeleteJUST STOP IT!!!! You have to stop all of it. YOur fantazballs keep blowing me away.
ReplyDeleteI totally want to try this! I might wait for the tortoise shell tutorial though to see which I might be able to do more successfully!
ReplyDeleteQuite impressive.
ReplyDeleteHere is my attempt! It's definitely not as masterful as yours, but damn I'm happy with it!!
ReplyDeletehttp://www.ikea.com/us/en/catalog/products/30125697
zoinks.. Ashley's post just directed me to this. You are crazy talented. I could never hand paint anything, let alone faux-malachite!
ReplyDeleteOK, it's official, I need to go back and read all of your old posts.
Fabulous! Was sent over from Bri's blog, Me, you and a wiener.What a great post and great tutorial!!
ReplyDeleteI cannot believe you made that!! Looks like an antique
ReplyDeleteI am dying to try this. I am loving all the faux finishes that you post!
ReplyDeleteI absolutely love this! Im going to give this technique a try. Thanks so much for sharing.
ReplyDeleteI AM OBSESSING OVER MALACHITE THESE DAYS SINCE I LET GO OF MY MALACHITE CHAMPAGNE BUCKET. GOING TO EXPERIMENT WITH MALACHITE FABRIC ON A LUCITE STOOL. WHAT DO YOU THINK? Stephanie fig at enchanted fig tree :)
ReplyDeleteI just love this! Awesome tutorial-will definitely be giving this a try. Thanks!
ReplyDelete