

It's finally finished and I am still alive to share it! This was a total race to the finish, and I had my doubts I'd get it done in time. I now have a brand new painting/ sewing studio/ guest room and I am so happy. So glad I committed to the One Room Challenge, as I am sure this room would still be collecting junk. I now have a pretty studio space to design my patterns and sew in.

This room had so many projects involved, and I kept adding new ones and driving myself crazy.
I mean who adds a faux burl cabinet IKEA hack less than a week before the reveal when you still have a boatload of sewing? Just me, and I feel like it has been years since I did a true DIY, so doing this many at once had me a bit mental.
Remember what this room used to look like?
It was my son's old room and had become the junk room.

This was my original inspiration board:

I wanted a cozy space that I could use as my studio. My office on the first floor was busting at the seams with my fabric design business. Fabric samples were everywhere and I have very little space to paint and create. My dining room had already been hijacked by sewing machines and my family was not loving my growing pains.
One big bonus is this room has great light. It faces Southeast, and the windows overlook the water so I decided to take it over and move half my office/ business upstairs. I still have my office downstairs as well, but that will be where I do my digitizing of designs, computer work and store my samples. I will post some pictures of that office soon- its been undergoing a makeover as well. This has kind of been a 2 for 1, and I feel like I have new motivation to get more rooms completed.

I decided on a terracotta and soft blue color scheme, a little lilac crept in there too.
I custom designed some of the fabrics for the room, since that is my day job after all. They can all be found in my Spoonflower shop here.
The large Tulip Stripe was originally going to be the wallpaper, but I quickly changed that up to grasscloth because I felt it would be too busy with the painted floor. I decided to use it as the draperies instead.
Originally I wanted to do panels with roman shades in the windows, but that changed as I laid out the room.
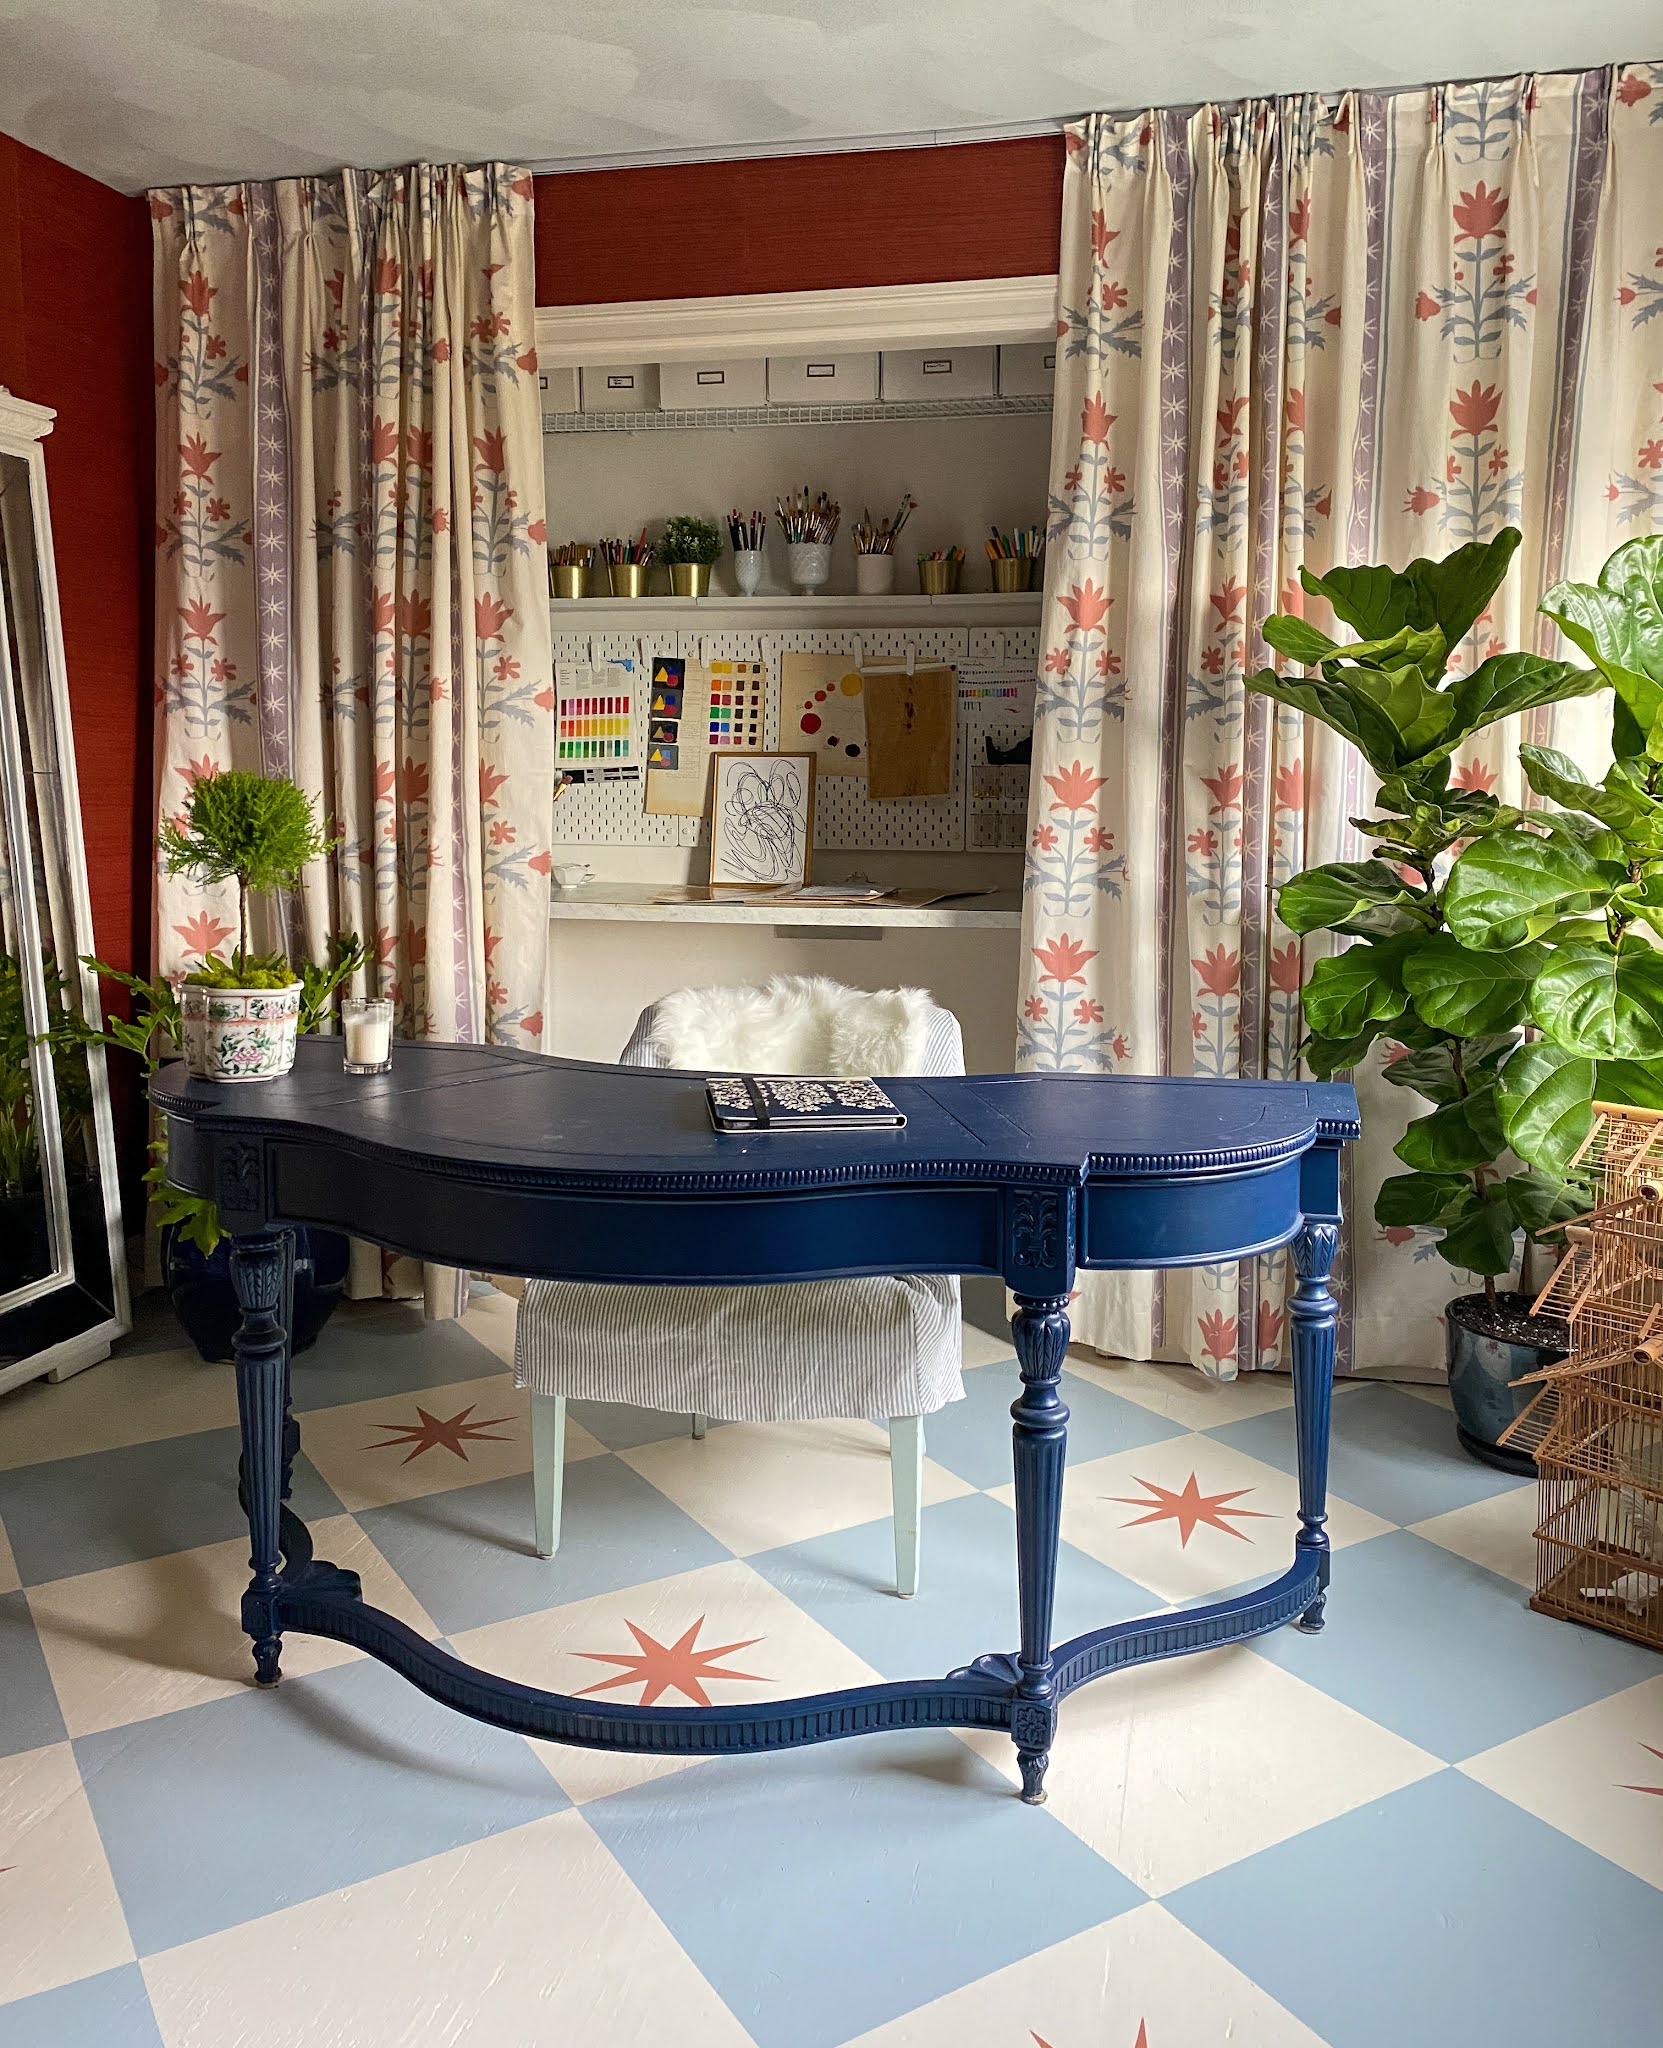
This room was going to be a workhorse and I had a ton of art supplies, fabrics and sewing machines to store so I took the closet and created a secondary work area. I added an 9' long Formica countertop with two 24" wide IKEA base cabinets that faced each other on both ends (no door, they are just open shelving). I added pegboard and shelving above. The closet was off center so I hid that by adding a curtain across the entire wall. A ceiling track worked out great and kept the curtain from feeling too formal and fussy. Everything is organized and out of sight when I'm not working in there or if guests arrive.
I call this office space 'Oz' since it's behind the curtain.

Still more storage was needed,
so I transformed an old IKEA KALLAX bookcase into a faux burl cabinet...

This was what it looked like before paint and some doors I built were added:

I built 4 doors out of pine 1x2's that were 14.25" x 30" and connected pairs together to create 2 bifold doors. The Kallax cubbies don't space out evenly, so bifold doors were just easier and I technically only had to hang two doors now instead of four.

My tutorial can be found on Instagram here .
I worked as a decorative artist for a couple years out of college and learned so many faux techniques. It takes some practice and a light touch, but its actually one of the easier finishes.


I added radio weave caning to the insides of the doors.

I attached the doors with simple brass cabinet hinges I found at my local hardware store and used cabinet magnets to close the doors.
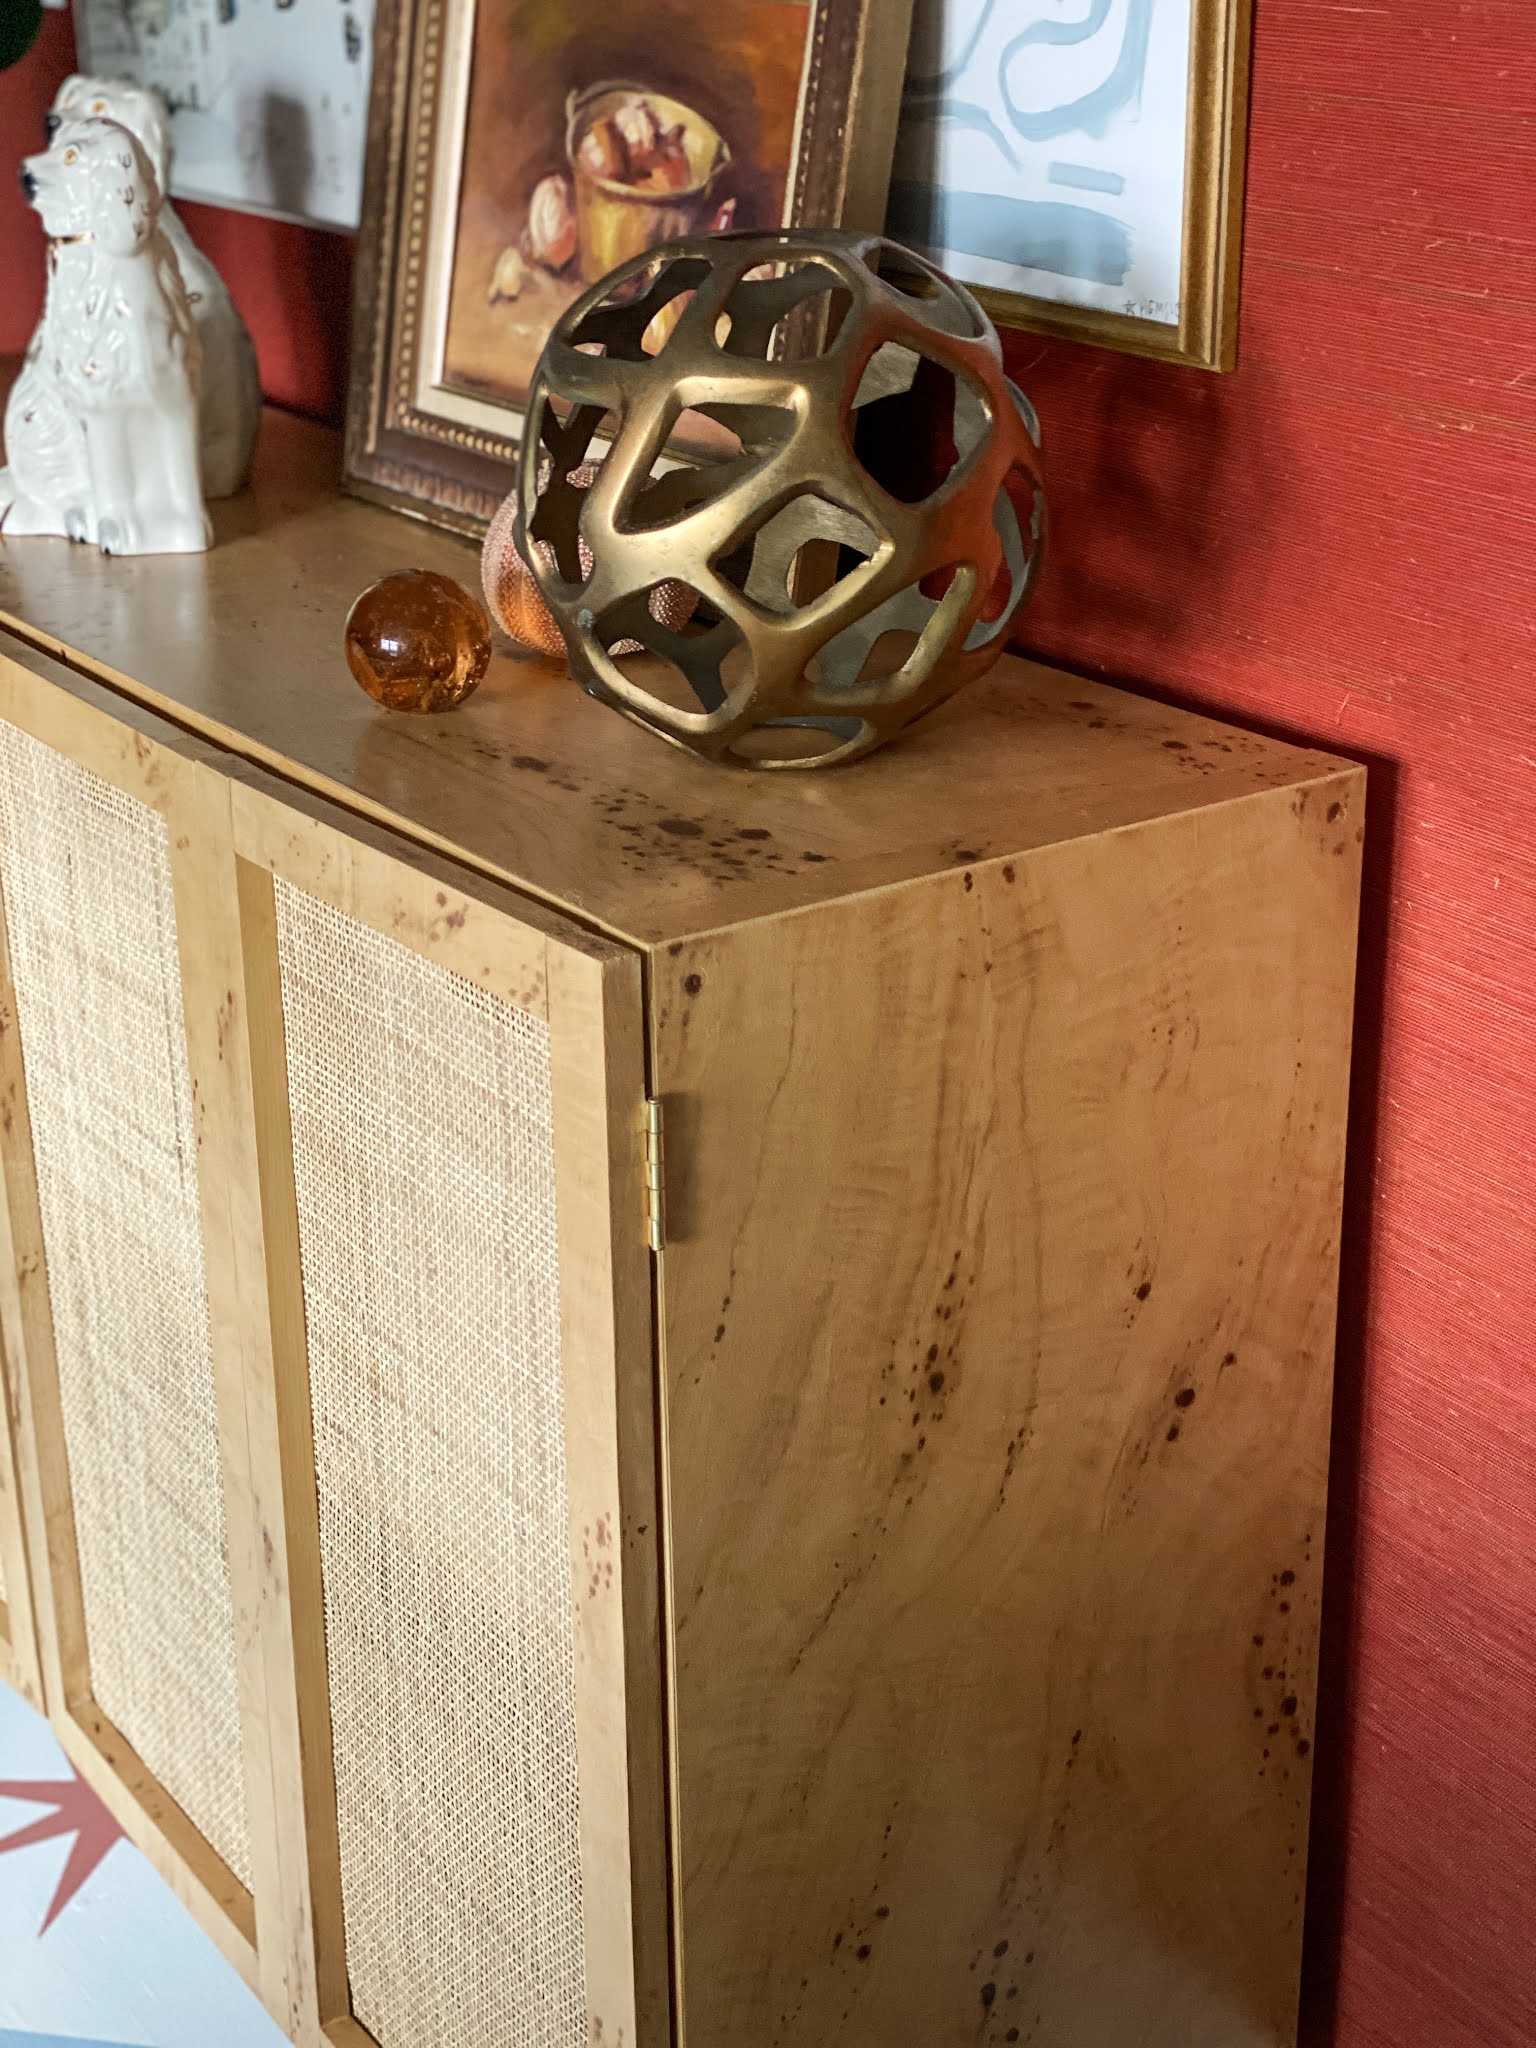

I added radio weave caning to the insides of the doors.
In the end I decided against doing knobs. I preferred the cleaner look without.


 Remember this corner? With its screwy double eves?


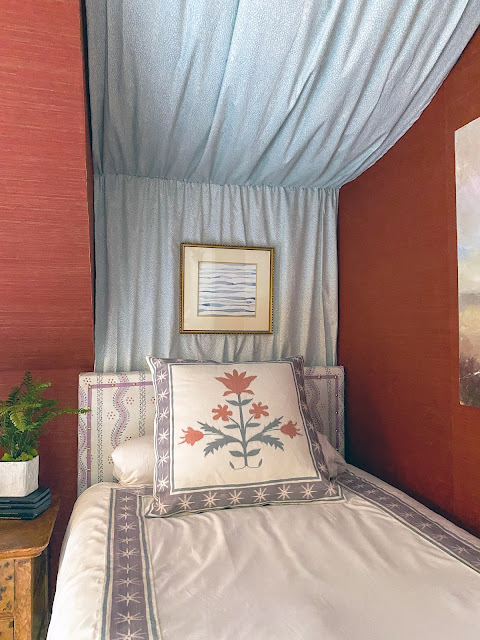
The nook fit a twin perfectly, so it totally dictated how this room would lay out.


The DIY projects don't end there.
There was also this makeover on my light fixture.

My original light only had two bulbs and the room was just too dark. I found a basic 6 bulb branch light here and transformed it into a brass tole inspired fixture covered in blossoms.
This entire light coast less than $75 when complete-including bulbs!


The How to Light Fixture Tutorial Video is on Instagram here.
It is actually so much easier than I thought it would be and it has me wanting to upgrade a couple other fixtures in my house . I found the craft metal here . It is a little lighter than the standard tin you'd find in Hobby Lobby. I was able to cut it with scissors, hammer on texture and bend it easily. This light doesn't have to be gold- I toyed with the idea of painting it cream and individually painting the flowers a color light traditional tole lights.
Now for the other half of the room. The Guest part...
I wanted to keep a twin bed in here as a daybed, just in case we needed extra space for visitors.


I had such a challenge creating a canopy to hide that. I really wanted a fancier canopy like in my inspiration picture, but the eve came out so far I couldn't create one that would be balanced on both sides without it looking stupid. I had to go with a simple draped one.


The canopy is made from 5 yards of fabric with 3 hidden rod pockets.
The rods inside the eves are simple white tension rods.
The rod at the end of the bed is a basic 3/4" gold rod from Home Depot. I took the ball off the side that went into the wall and hung it using these brackets I found. They came silver, so I sprayed them gold to match.


The little dresser was actually mine as a child. I faux painted it about 7 years ago.
Right after I took these pictures my son stole it for his room. I'm trying to find a replacement.


I reupholstered the headboard and dust skirt using my Andrew Stripe fabric.
I originally made it back in 2015 for my son's room. Here is the tutorial.
I will do one on how to make a dust skirt. Its actually very simple in terms of sewing, but there is a lot of math to get the pleats to fall where you want.

I found the little bench and my desk at estate sales.
Large mirror was a wedding gift
I love the desk in this room, but it might be getting swapped out with the desk in my other office. I'm realizing it's not as practical for painting as I had hoped with the curve. I have a deeper rectangular desk downstairs... I will let you know where everything ends up once I finish that room.
I am so thrilled to finally the room complete. I have never done a One Room Challenge, and I knew that giving myself a deadline is the only way to get it done. In my true 11th hour style of course!
I am off to take a huge nap in that daybed and get back to my normal routine.
I can't wait to create some new patterns in this space!
Please be sure to check out all the other amazing transformations by this season's participants. It is so inspiring to see the creativity and hard work!

1 comment:
Oh my goodness. This round of the ORC, your room has been the one I was most excited to see completed and it did.not.disappoint. I am speechless - and more than a little jealous! Looks incredible, and has me wanted to use this as inspiration for a playroom/family room in our long neglected upstairs room with wonky ceilings!
Post a Comment