
I think I finally fixed the "missing photo glitch"-
(I recently added a Pinterest widget incorrectly. whoops!)
Please go about business as usual... and thanks for your patience!
I was recently invited to join the True Value DIY Squad.
(I recently added a Pinterest widget incorrectly. whoops!)
Please go about business as usual... and thanks for your patience!
I was recently invited to join the True Value DIY Squad.
Can I tell you how excited I am about this? Besides the fact that it is an amazing opportunity and that they are a great company, I have an ulterior motive. Lack of mojo & so many unfinished projects! I'm just a tad bit overwhelmed with a heavy workload and a renovation that has seemed to stall once the kid’s started summer vacation. So why join the DIY Squad when I am in this state?
One word... deadlines. I love them!
They make things happen, get me focused and things get DONE.
So get ready, I’ve been busy!

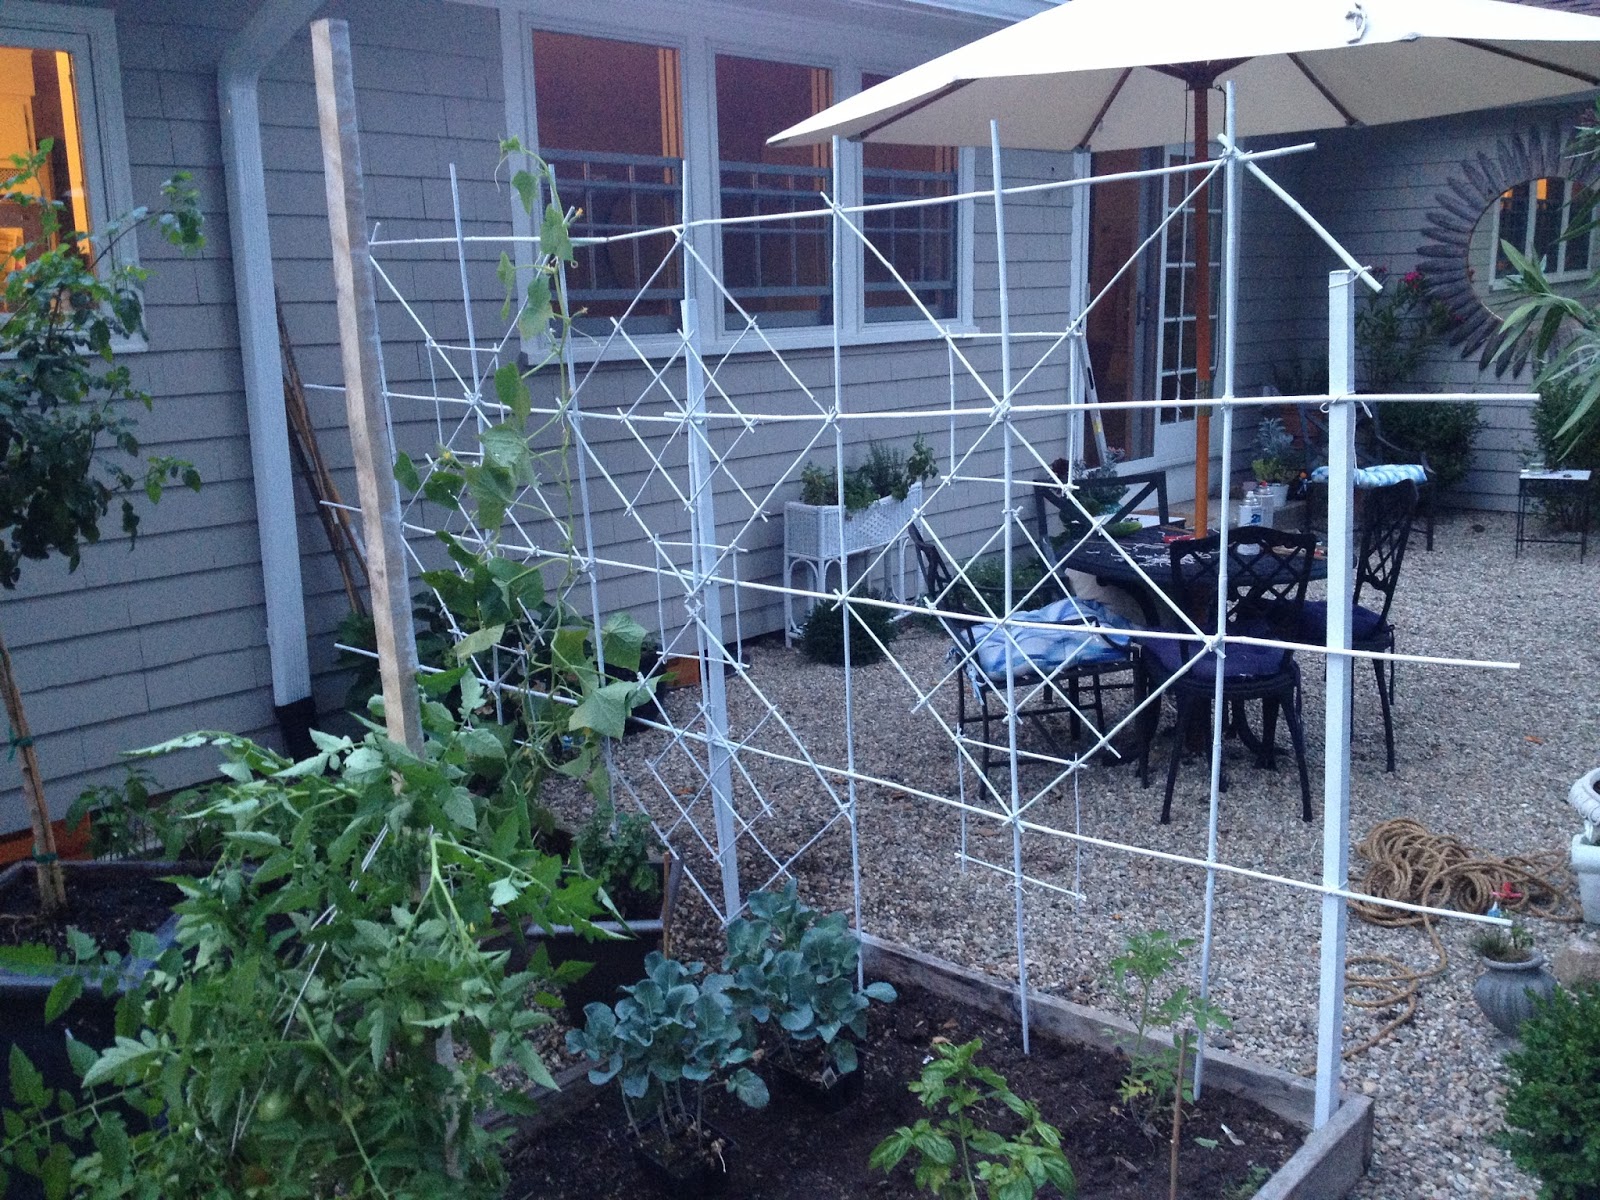
While brainstorming project ideas I realized I had a ton of them right on my patio. We laid our pea stone patio back in May, but hadn't done much else. Two big issues we were having were lack of privacy (we're on a corner lot) and raised beds that were falling apart.
Here are a few before shots...


So I perused True Value's aisles for inspiration and I came across a big assortment of bamboo stakes.


I knew I could whip up a privacy trellis with these. I bought two (6) packs of 6' bamboo stakes, two (25) packs of 2' stakes and three thick 6' wooden stakes.
I also hit my favorite aisle because I knew I was going to be painting the trellis white...

all hail the mighty spray paint!
I got everything home, measured the width of the area I was trellising and started sketching.
I actually found it easier to lay the bamboo out on the floor and play with designs that way.
After a bit I decided on a design and got busy building.

Now before you start you will need to know how to 'lash' bamboo. Lash is just a word that means 'to tie together'. I found some great videos online that demonstrate it really well, and this one was my favorite.

I tried to draw out the basic steps for you below, but I highly recommend the video if you are a
visual learner
and stink at understanding knots like me.
Waxed lashing cord is recommended, but I wanted to paint this and I know paint will not stick to wax.
I went with basic cotton twine.

The design I made consists of two 6' wide panels that are joined in the center with additional squares.
I created an instruction sheet you can download and print to make the layout a bit easier to understand.


To make my trellis I created (9) one foot squares by cutting the 24" stakes in half with pruning shears and lashing the corners.
I made four 24" squares that had a crisscross central design...


I joined the 24" square to the center of (6) six foot poles, and lashed all the connection points.
The panel was now stable so I brought it outside and put it in place to see how it would look.
It was actually much easier to work on this way, so I continued adding my squares to the grid.


I loosely tied the two panels up and inspected my work.
Honestly, I was happy with them the way they were and could have kept them just like this if trellising was all I was after. I realized that if I wanted more privacy I will need to fill them in a bit more.

I kept adding my squares until I was content, and then I finished it all off with two six foot stakes tied across the top. I untied the giant panel from the end stakes and gave it one more coat of paint.
Once dry, I reattached it to the main stakes with more permanent lashings.
Next year I plan on growing lots of vines for more privacy.


This project took a good part of the day, but the entire cost for the 6' x 12' trellis wall was less than $50 and it allows for a lot of flexibility as far as size and design goes.
If you can sketch it, you can probably build it!
Now that privacy was no longer an issue I moved onto the next project.
The raised beds were looking a little rough. When we built the patio they were existing, and we just incorporated them into the design.
Over the years the corners had pulled apart from frost heaves...

The wood was in good shape so I decided to fix them. I started by cleaning out any pebbles and debris in the corner connections and hammering the corners back together.
Next I attached metal "L" brackets to the inside corners for extra reinforcement. True Value's hardware aisle had so many sizes to choose from, and there is always an expert around to help you if you get overwhelmed with the selection.

Everything was tightened up and square, but they were just plain raised beds and I couldn’t leave well enough alone.
I had to give them some personality.
I’ve been loving the rope wrapped trend I was seeing everywhere, and decided to apply it to my raised beds.
The bonus would be structural reinforcement too.

This would allow for approximately 3 rows of rope as a decorative detail.
I also picked up some fence staples. Choose ones that are more than double the width of your rope. I used 3/4" and wished I had gotten a size bigger.
I also grabbed some basic nails for extra security and I was ready to go.
The rope came with the ends taped, which worked to my advantage. I used that end to drive a nail into to secure it to the wood. I would be hiding that connection with rope as I wrapped around a few more times. Use the staples every foot and as you turn corners...


They are very easy to use. First press or tap them into the rope, and then just hammer them in place.


I was really happy with how things were looking. Unfortunately the weather was not cooperating with my project. It started to downpour just as I completed my first bed.
I was impatient and excited to finish so I pushed on.
BAD IDEA! DO NOT do this in the rain or with wet rope.
Did you know rope stretches out when wet? I noticed it, but thought "This is great, it really makes the rope stretchy and flexible. This will probably shrink as it dries and be really tight!"
WRONG! When I went outside the next day I was horrified to find this:

Womp womp womp.
The bed I did first on the left (no rain) was just fine, the other two were big sloppy messes!
I also learned I had to nail down every 12". I got lazy and was doing every 24" thinking it was going to "tighten" up- my bad!
So I unwrapped those beds and redid them the right way.
I even added extra fence staples just incase...

So much better!


Now the garden was looking neat and clean, except for a couple of tired old plastic pots.
Paint to the rescue!

I wanted them to feel like traditional hand painted blue & white pottery.
Hand painted is code for "not too precise" and "I can mess up and it will still look fine".
I used a white spray paint designed for plastic (once again Rustoleum's Painter's Touch 2X Ultra Cover) and had the fab True Value paint department mix me up a pint of
Benjamin Moore "Patriot Blue". I grabbed some artist brushes, a uni Paint pen in blue and Rustoleum Crystal Clear Enamel to make it look shiny like real pottery.

And I painted away...


-2 coats of white paint
-lightly sketch a vine in pencil
-trace pencil with the blue paint pen
-fill in vine with leaves and add banding to top and bottom,
use your imagination
-spray with 2 coats of glossy clear coat when dry
Yes, those are tomato plants in there.
Most normal people would not be painting pots with plants in them, and I am obviously not normal.
I had to wrap them in plastic bags and tape off the dirt to paint them.
A bit of a pain, but I am loving their new look...


and the best part was it only took about an hour to do!
After all the hard work the family & I got to enjoy the new view with a celebratory fire/ marshmallow roast.


Looking out...


and in...


For more garden DIY inspiration, take a look at True Value’s Pinterest boards.
I was one of the bloggers selected by True Value to work on the DIY Squad. I have been compensated for my time commitment to the program as well as writing about my experience. I have also been compensated for the materials needed for my DIY project. However, my opinions are entirely my own and I have not been paid to publish positive comments.

12 comments:
So many pictures...but they aren't loading! Maybe it's just me? Dying to see...
No pictures here either...
None here either. All broken.
Thanks for your patience and for letting me know! I think I fixed the glitch- please let me know if you still are having problems.
Love the trellis in particular! So YOU. I mean the design, yes, but also the fact that you decided to DESIGN YOUR TRELLIS.
Looks so great.
Great job, love how the rope trim on those beds looks so great! Love it all.
xo Nancy
wow that looks really great! I love the DIY trellis.
You.....are a hard worker! Love the painted planter. I felt so bad for you with the rope problem:(
The bamboo trellis looks great! Such a good idea.
Rachel
www.RachelBishopDesigns.com
Like a dork I posted this accidentally on some old post from 2011, so lets try this again.
Did you see your O'verlays were featured on MSN?
http://living.msn.com/home-decor/diy-decorating/25-brilliant-ikea-hacks#10
Good work. The way your clean lines structure the whole enterprise is really an improvement. Nice garden. Ann
You made a really crafty garden trellis here! It added a great amount of curb appeal to your property, and is functional as well. It's really amazing. I bet you're enjoying your handiwork more while sipping your coffee or tea on your patio. And oh, thank you for the tutorial. :)
Oliva @awnings-unlimited.com
Post a Comment