Showing posts with label how to happy hour. Show all posts

Faux Tortoise Shell How To (and more)


Alright, I know a lot of you guys have been waiting patiently for this one.
  Sorry it took so long, but here is your Faux Tortoise Shell 101.
  I'm so glad all my years of decorative painting are finally good for something. 
Get the piece your want to transform. Prime and paint in a Cadmium Yellow. (We will get to the turquoise version next.) I actually found a Valspar spray paint from Lowe's in a bright yellow (Bumblebee) that worked well...
If you have a larger surface I recommend dividing the area. Tortoise shell is usually an inlay, and therefore done in smaller pieces. I divided my table into thirds, drew faint lines and taped one section off.


Next, I mixed my glazes. I used 3 parts latex glaze to 1 part paint. Use artist acrylics for your paint.  The lighter glaze is made up of raw umber, yellow ochre and a bit of burnt sienna. I unfortunately was out of yellow ochre and raw umber so I used regular a Ben Moore paint I had lying around that was close to the final glaze color. *This made it more opaque and cloudy, not really what you want, but will be good enough if in pinch.

The darker glaze uses burnt umber and black in equal parts.

Brush on your lighter glaze and sponge it off with a damp sea sponge...


Using a softening brush to feather the glaze by lightly making crisscross strokes over the area.
-THIS BRUSH IS SUPER IMPORTANT!!!-
click here to see where to get one for $20. Mine cost $32. You need this brush, or else you'll get a big fail (see below in the turquoise section) like I did when I tried to paint this with an old, beat up one.
Next apply the darker glaze in patches/splotches. They can be big or small depending on the look you want.


Lightly sponge off any very heavy areas and soften... alot.

The softening gives it a cloudy, fogged out appearance.

Let it dry and repeat for each section.

Spray with two coats of polyurethane and you are done.
Easy, right? It really is, you just need the magic softening brush.

Now for the turquoise version. I got alot of emails and how to requests about Jennifer Boles
mantle...

I know there were just as many haters as there were lovers, so haters, just skip this next section.
I happened to think it was pretty fabulous and brave.

So first paint your piece. Once again I scored with a spray paint (Valspar- Mediterranean), such a smoother finish than brushing it on.
Brush on the darker glaze from the last section, and wipe off. The main idea here is to mute the base color a bit. Let it dry. Add your splotches like before and go to town feathering and softening...


And that is it. So what happens if you don't have a softening brush?

FAIL!!!

So there is one more finish Jenny from Little Green Notebook had posted about. This one on a mirror from Todd Romano...

I was kinda digging it, so I sprayed a lamp I found for $2 turquoise
 and striped away using the leftover dark glaze.


It started feeling a little Beetle juicy, and I sorta fell out of love. I did the tortoise on the base.
My little lamp just isn't as cool as Todd's mirror frame.

"feel sorry for me, I'm just a sad $2 lamp that got sacrificed for a blog"

I did shoot some video on the yellow tortoise shell,
 and I will post it later in the morning once I get a chance to edit .
If I left anything out or was confusing just give me a shout.
Thanks!

How To: Faux Malachite

No video today, I'm feeling a little under the weather. Sorry. But I do have a step by step how to on  Faux Malachite. I know I was going to do Tortoise Shell, and I will, but  I feel crappy and malachite lamps just sounded better.  So lets get started.
First go find something to turn into stone, I had these "totally awesome" 80's lamps with super cheap lacquered brass.
But you can do it on anything, check these chairs I saw on Parlour the other day...


If I had a pair kicking around, I would have done them too. For now, back to the lamp...
Base coat with a pale blue/green. I only needed a small amount so I picked up a tester of Glidden's G14- Almost Aqua for $1.99.

Next mix 3 parts glaze with 1 part paint. The paint needs to be a deep emerald green, similar to Ben Moore's 2049-10 pacific sea teal or 2051-10 yukon green. Do a test patch. You may want to add some black to darken, or tint it in either direction with blue or yellow to your liking.

Start by brushing on an area, and quickly removing it with torn pieces of cardboard. Practice this technique first before heading straight to your project. You'll want to look at some malachite and mimic the wiggly curves. You can also use a fan brush for this technique. ( I just couldn't find mine.)

Keep painting more glaze on and removing...

Next you'll want to soften the hard lines and thick edges. Using a brush, lightly stipple or tap the surface to flatten and soften...

Let it dry. I wasn't thrilled with mine, so I lightly rubbed some green glaze over the whole lamp to deepen it a bit.  Next coat with a high gloss varnish. I gave mine 2 coats of a spray lacquer.


A little trick to tone down cheap laquered brass...
I use this product. I just brush a little on, and stipple it out to give it more of an antiqued gilt look.

And that is it. Just one more lamp to go and my entrance has a new set of lights.
Not sure about the shades though, they might need a makeover too.

I'll be back when I feel a little better.
Have a great rest of the weekend.


DIY Zebra Hide and Giveaway!

My 5 yr old: "Mom, why are you painting a dead zebra?"
Me: "I'm making a zebra rug for my blog."
5 yr old: "But why does anyone want a dead zebra on the floor?"
Me: "Because it looks cool."

Can you ever have too much zebra?
Of course you can!

You can also have too little (ie. the zebra speedo).
But we're not going there. Moderation my zebra lovers, moderation.
Today we are making the above rug. Just the right amount to punch up a room with some
 graphic black and white.
 Here is what you'll need...

-6x9 canvas drop cloth (got mine at Home Depot for $9.97)-larger if you want a GIANT zebra
-White primer
-small roller
-tape
-2 brushes- one about 1/2 inch, the other 1"
-Black or brownish black paint (I used C2 French Roast)
-Latex Polyurethane-satin finish
-rug pad (optional)
-rubber cement, or other adhesive to attach rug pad
-scissors
-tape
-images of zebra hides as a reference
-plastic dropcloth
-comfortable clothes because you're gonna be crawling on the floor for a bit


                        And if you don't feel like making your own this rug could be yours! I'm giving it away.
To enter "like" my Facebook page, Follow this blog, or Tweet this. Leave a comment below for each one you did. You know the drill, I just want to feel popular. Winner will be announced Friday.
Now go watch another boring DIY video of yours truly and get your learn on.
 Its short. I promise.
No zebras were harmed in the making of this "hide". 


How To Happy Hour- Paint Your Own Fabric

OK folks, here it is...  Handmade Fabric wins! After watching this through I realized we needed to drink more before hand. I kind of feel like the NPR ladies from SNL
in some parts. Schwetty Balls anyone?
So go mix yourself a French (Champagne) Mojito here and get ready to make some fabric.   We will be mixing our own homemade paint from dried milk and powdered pigment, as well as testing out a couple products on the market. 
This technique can be done on small items such as pillows, window treatments, handbags... or major yardage if you have patience and have alot of time to kill.
 I'm still new to editing and thought I'd be able to add the material list to the movie as they were used. (I'm sure I can, I'm just not savvy enough yet.)
 I've listed the Materials List below. 
Also, I had to cut a few segments out (fabric markers and pens), but those are a no brainer... if you can write or draw you can use them. If you have any questions about anything please contact me.

Also be sure to check out Kristy from Hyphen Interior's post. She painted a wingback chair, I mean completely changed its color. Amazing!

Materials Used :
Medium Weight Cotton
Heavy Weight Linen
Powdered Milk
Powdered Pigments (available here and here)
Dye-na-Flow by Jacquard
Crayola Fabric Markers
Simply Spray Fabric Paint from AC Moore
Brushes
Stencil Paper/Stencils
Imagination and Inspiration
Iron for setting paint

Help Me Help You

Morning! I am getting ready to do my next How to Happy Hour and I need some feedback. I have a couple things I want to do, but can't decide. What would you guys like to see...


1) Be Your Own Fabric Designer: How to make your own handpainted fabric.
 Can be used for drapes, pillows you name it in. And I'm not talking about using Puffy Paint or the stuff you buy at the craft store.  You will be so estatic you will be rolling naked in it...

2) Zebra Floorcloth and/or Table...I had a couple of emails about my floor cloth I made from way back when and also about the Zebra table in my first HTHH...

So please pick one for me to do because my decision making braincells are on strike.
Thanks! Oh, and if you have any great cocktail suggestions I'll love you forever!

How To Happy Hour- Faux Carrara Marble + IKEA hack

(Update: Video "How To" is at the end of this post.)

Hello my lovelies! Its cocktail time!
Today we will be drinking Blood Orange Cosmos thanks to my dear friend Nancy Stanley. She is an amazing photographer (and one of my sponsors so check her out!) and she just returned from a week in Vegas.  While there she drank these at the Cosmopolitan Hotel and loves them so much she is planning an entire party around the drink. I love her!
So here are the ingredients...
Hanger One Mandarin Vodka
Salerno Blood Orange Liquor
White Cranberry Juice
Splash of simple syrup
shake with ice and serve

Now to get down to business. We will be "fauxing" Carerra marble on an IKEA Docksta table to make it look more like a marble top Saarinen table. I have been marbleizing my Formica counters all week and thought the Docksta would be a good size for a quick project.
Here is a peek at Phase One of the Cheapest Kitchen Renovation ever... ignore my pot of chicken soup please...
Here is the before (and yes that is my bottle of saving grace sitting on counter, LONG week)...
So to do this technique you will need the following materials...
-First make sure the surface is lightly sanded and primed. I used XIM bonder primer- 2 coats.
-Next mix your  medium gray glaze that you will use for the veins. 
I used 2 parts white primer or flat white paint, 1 part Open Time (or latex glaze) and a few drops of black. I also added just a drop of cobalt blue tint to keep it a cool gray.
-Sip. Believe it or not the alcohol helps you relax and loosen up. You want a relaxed soft hand. You don't want heavy lightening bolt veins.
-In a larger container mix your white glaze...2 parts white with one part Open Time or latex glaze.
Get your brushes, a damp sea sponge, and glazes ready. You can focus on a small area or the entire surface, just be prepared to move quickly.
Have pictures or actual samples of marble around for reference. You will notice that the veining runs the gamut from heavy to almost non-existent. Figure out what you like and aim to replicate that.

-Start by first sponging the area with white glaze, and then start filling in the ground with a large gray drift. This is going to be softened and will fade out, so don't worry about it seeming too dark. Lightly sponge areas to soften and then use your feathering brush to lightly fade the edges. Brush back and forth using an X or figure 8 motion.

Continue to soften and add more gray veins along the edges of this "cloud".

The goal is to build layers and depth. Sponge a layer of white glaze over the entire surface and then feather it with your brush. Step back and look at the area. If you want it darker do the previous steps again. Next you will start to add more specific sharper veins.

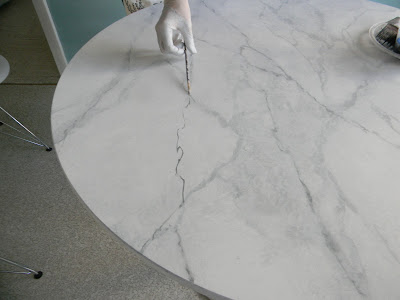
You can use either a feather or a piece of thin cardboard torn in the shape of one like I did below. You will now lay in your main veins. Dip it into your gray glazed and with a gentle hand drag and roll it down.


You  don't want to make straight lines.  You want to make them run on 45 degree angles and avoid making "X"s Practice this technique on cardboard a few times until you are comfortable. Gently feather the veins to soften them.

Next use a smaller brush to create the finer veins. Hold the brush like a conductor and gently roll and pull...

You can come back down again and connect areas to give it a fractured look...
Again,  feather these veins. if any seem too dark soften them by sponging over with white and feathering.
Take another break and come back and decide where you are at.
Do you want more veining? Too Soft/ Heavy?
Add or adjust to your liking. You can spend hours playing around, but I recommend stepping away and getting fresh eyes. For example I ended with this...
But went back and added more gray drifts and veins to get this look...

When you are happy and it is dry, clear coat it with an acrylic polyurethane. (Avoid oil-based, it will yellow it.) 2-3 coats is recommended.
 I will try to get a video up soon. It is much easier to show technique that way.
If you have any questions or need me to be more specific please ask. (I feel like there is no way I got all my info in that was on the video.) Happy Weekend and Cheers!
Update & Close Ups:
Hi everyone and thank you Apartment Therapy for posting this! I just wanted to post some close up shots for you guys. Its been almost 3 months since I painted and everything is holding great. I just don't over use Mr.Clean's magic eraser anymore. Its is great to get out stains, but rubbing too much dulls some of the polyurethane's sheen.  No biggy, just recoat.
Here are the requested close ups. I had to use a flash because I'm losing daylight here, but it actually lets you see the subtle "paint" texture. You can't see this at all in regular light, actually looks very smooth but its good to see the extreme...

I have fooled a lot of people with these counters.  Its not until I point it out that they realize its paint.  It doesn't have the cool touch of marble obviously, and if you study it you will notice its painted, but it gives the overall illusion and look of marble... and not in a "marblized laminate" sort of way.
 I actually have a paint splotch that I didn't notice until I was polyurethaning, but I use it to show people its paint. Its near the corner, and I posted a close up farther down...
 Adding layers gives it depth and feathering and softening the veins is key to giving it a soft fogged feel. It just takes practice. I learned this technique in a weekend and have practiced it for years, but have taught several people who have tackled this like pros. Practice, Practice, Practice.


And here is the "oops" paint splotch...
Thanks for all you sweet comments!
And feel free to email me if you have any questions.

UPDATE:
For all you laminate cabinet haters (me included) I finally painted them.
Here is the kitchen all renovated with paint (literally!) 1 1/2 years later:


LinkWithin

Related Posts with Thumbnails