
Floor is painted!
It was a long road to get here but I am so happy with it.
As promised, I am going to go over all the details.
I also got the grasscloth up and I have an excellent video I found that shows you how to paste the walls, not the paper, which was so much easier and so much neater.
Watch it here.

Back to the floors...
So some of you might know that back in the day I used to be a Decorative Painter. I painted floors, walls, gilded ceilings, faux marbled and grained, painted murals, you name it, for several years out of college.
I was a little rusty, and my knees and back definitely have aged, but I was glad I could still crank one out.

These floors were painted over plywood sub-flooring...
remember this nightmare from a couple weeks ago?

STEP 1:
Prepping the surface of your floors is key...
I scraped, sanded, wood puttied nail holes and seams, sanded some more and vacuumed like a madwoman until I had a surface I was happy with. You want to make sure there is no residue or oil that will repel paint, and since I had disintegrated carpet pad stuck to mine, I had lots of scraping and sanding to remove it.

STEP 2:
Prime and base coat your floors.
I used California Paint's ALLFLOR for my paint.
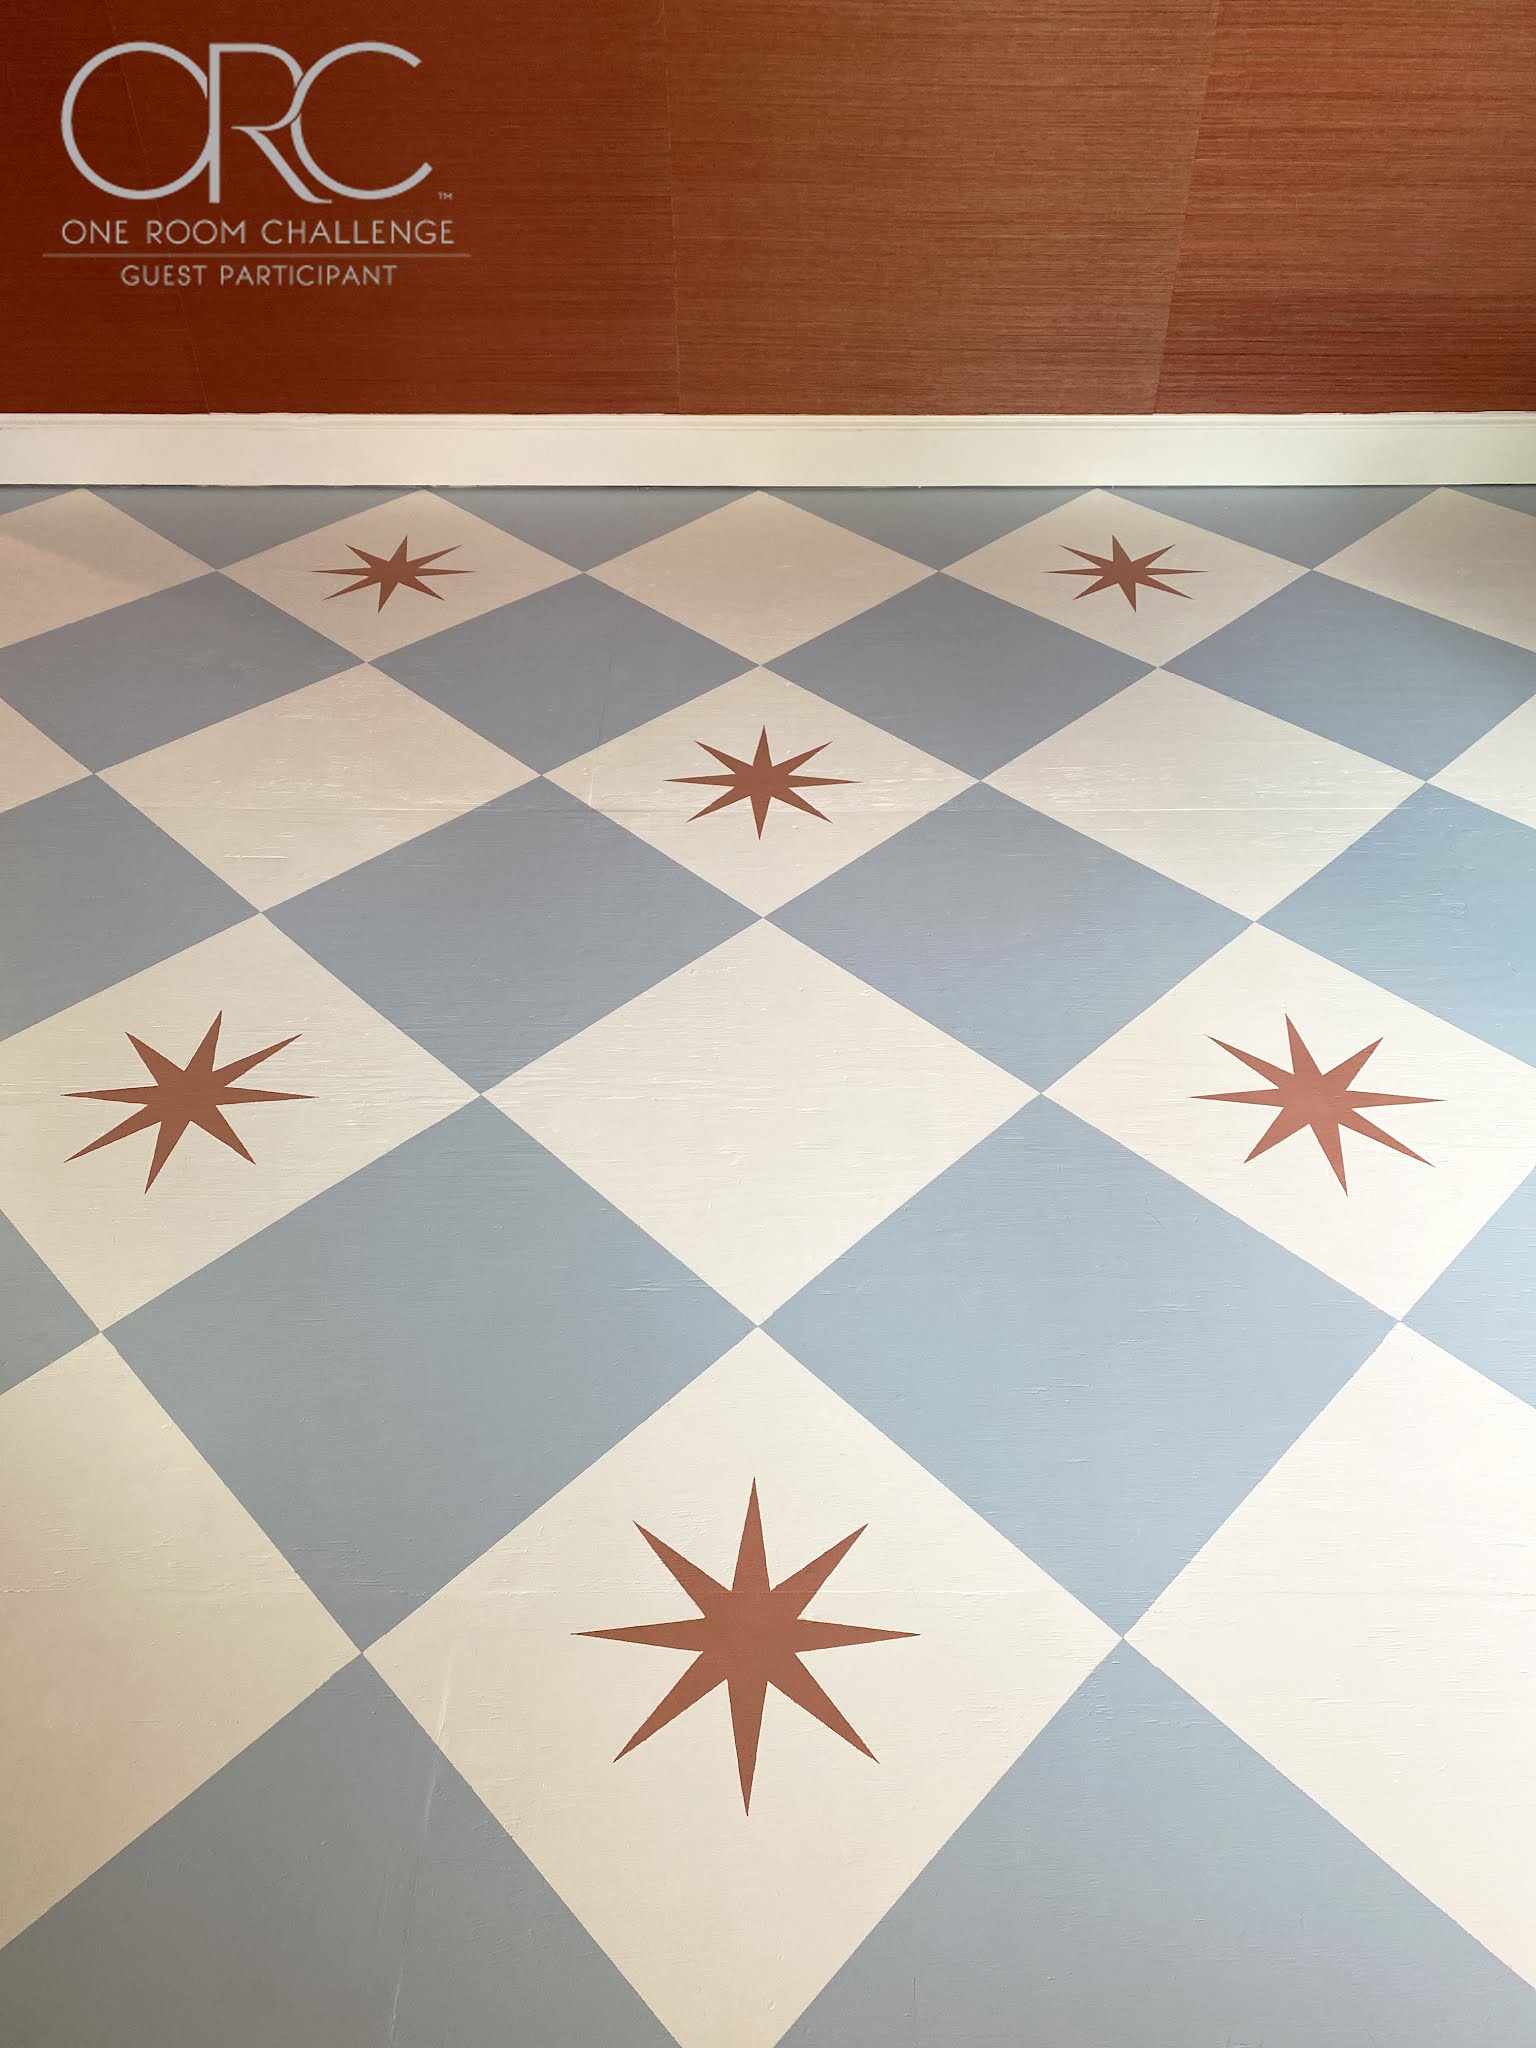
My paint store tinted the base coat to a cream tone, and I also had them tint two separate quarts to match Farrow & Ball "Red Earth" and "Parma Gray" for the stars and checkers.
They told me I didn't need a primer since I had prepped my floor well, but I would recommend it just in case. I had a funky spot in the closet area where paint lifted.
(Think I got lazy in there because I knew noon would see it.)
My floors were well covered in two coats. Be sure to allow ample dry time between coats!

STEP 3:
Laying out the design
This is the part that requires lots of math. I prefer to have my design fall evenly across the floor, so I need to determine how many squares will fit along each wall. Hopefully this picture explains what I mean.
Notice how I have perfect half blue checkers along the edges,
and the tips of the white squares touch the wall.
On the perpendicular wall, the same is true but in reverse:

I created my design in Photoshop first so I could play with colors:

Planning out the layout will save you big headaches as opposed to forcing a particular sized square to fit your room. If you must have, lets say 18" squares and won't budge, you can do it by finding the exact center of the room and then drawing two cross lines that run through it. You would then start in the center and work out. Only problem is that you might end up with tiny pieces of squares along the edges.
I prefer the above look so I try to find the size that will fit best. Take your time, grab a calculator or use one of these handy right triangle calculators - and grab a notebook to sketch out your floor. I am so sorry for what's about to follow. I tried my hardest to have this make sense, but I'm a do'er not a teacher.
First you will need to revisit the Pythagorean Formula...


OK. If you made it this far, we should hang out because you'd probably get me.
Last part...if you have nooks, all you need to do is trace one of your squares and create a template out of poster board. You want to line this template up with existing squares you created with chalk lines. Trace it faintly with a pencil and continue moving it, lining it up and tracing into any nooks and crannies.
Good lord, I hope this makes sense. I wish I could just come over and floor whisper to you.
Once this part is done, time to tape...
I screwed this part up big time because I had my kid's calling for their Uber rides.
DO this when you have no distractions, and no drinking wine until your second coat of paint.
You will need to mark off every square you DO NOT want to paint, I used a small piece of tape in the centers to do that. Next you will tape inside of the lines of all those squares. That's it.
Use an Exact-o knife to trim your tape edges where they overlap. Also, use good quality tape- Frog Tape or Sensitive Surfaces by 3M. I had a roll of both so excuse the 2 colors here....

Now paint the squares that don't have tape int eh centers.
Mine took two coats.

Pull your tape carefully, I like to pull, angled all the way back from the painted edge,
keeping my tape low towards the floor.
There will be blood. I had lots of bleeding due to the texture of y plywood.
Grab a small angled brush and touch up using the base color.

Lastly, if you want to embellish further...
I made an 8 point star stencil using an unused piece of old peel and stick wallpaper.
Contact paper also works great.
I sketched the design onto the paper and then cut it out with my Exact-o knife and a straight edge.
Just keep the backing paper on the outside edges of your stencil, but remove it close to where you will be painting. This allows for you to lift and position the stencil easily. Find the center of your square and adjust your stencil. When its where you like, press the peeled sticky edges down. I used a foam roller lightly coated with paint. I rolled a coat on and used a hairdryer to speed drying. There was lots of bleeding, it I fixed it with touch up paint.
Also , dry the back of your stencil with hair dryer each move, it keeps paint from spreading...

And that's all she wrote.
I hung the grasscloth shortly after, and have started bring pieces of furniture in.
Originally I thought I would have my desk in the window,
but it felt too close to the bed.

Desk will be getting painted, and the wall behind it will be completely curtained to hide my closet/ storage/ sewing area... This will also hide the fact hat the closet is off center.

As far as the day bed goes, I am now building something like this.
Canopy has not been determined.
Here are 2 options... Ignore the crappy photoshop.


Be sure to check out all the Week 4 ORC Updates here!
See you next week...

3 comments:
I LOVE this pattern! It looks so good!
Did you seal the paint with anything? Or how do you prevent chipping?
I love this pattern!Or how do you prevent chipping. looking is very beautful.
Contemporary Area Rugs
Post a Comment