Showing posts with label before/after. Show all posts

Keeping it real: House Tour & some Foils

I decided to do a real life segment.  Nothing staged up all perfect, just real life and a cool space.
 
I have friends that bought a house, gutted it, and redid it almost completely by themselves.  I had to share it because I am so completely impressed with their skills.  They used basic materials that are affordable and readily available and thought outside the box. 

Meet the adorable and talented power team that is Grant & Becca...

They bought this a few years back, and I know at several points they felt like they wish that they hadn't.  It was a lot of blood, sweat and tears...

It all eventually got finished, and now it is super awesome...

I love the fact that they did this themselves and that they took everyday materials and utilized them to add character and a funky modern edge.  Like the use of three different types of siding.
It gives the exterior a more streamline and hip feel...

I have known these guys since pre-kids.  We now each have 2.  Grant is also my hairdresser.  This happens a lot during play dates.  Blondness...
(OK, so my roots aren't keeping it real)
Grant and Becca were nice enough to let me share some interior shots, even though our kids had ransacked the house.  Just ignore the sippy cups and toys.

My favorite part of their house is their kitchen.  They used IKEA cabinets a few different colors and styles to create a more custom look, and did a great job mixing high with low.
They got this old soapstone sink for a song.  Someone was throwing it out. It was in a basement and they basically just had to pay $350 to have it moved.  And look how much character it adds...

They used dark oak for the island cabinets and white ones along the walls...
And one of my favorite tricks was using the flooring to panel the eating side of the island...
Another IKEA trick, mounting a metal cabinet in an under utilized corner to create a bar...

And the entire first floor is open so the kids have a ball and stay within view...
Thanks Becca & Grant for sharing.  You get big belly fives...


(Our sons get all Milli Vanilli stomach slamming when they hang out.
These pics are almost 2 years apart, but they never fail. Its like their secret handshake...)


She done me proud...

I knew when I shipped O'verlays to Bri over at Me, You and a Wiener she would make something spectacular.  She is after all, IMO, the "Queen of Hacking".  So when I saw, this I was beyond excited...


She used the 5"x19" Danikas on this dresser and performed a magical facelift!
before..
I had a serious proud parent moment.  Cheryle and I are so pumped to see the O'verlays in action.  I love seeing how they are getting used, the colors and applications... just when I think I couldn't imagine another combination... BOOM, and there it is...

Now go hop over and see how Bri did this and tell her she rocks!

Do you have a before and after O'verlays project? We want to see it!

Thursday's Timesuck

Warning: The following post will not enhance your interiors at all.

Guess where I've been wasting time? No, its not a mugshot.
Its my before shot for my hairdo montage.  I was bored and had a lot of work to do, so I thought I'd procrasinate and try on a hairstyle or twenty two.  I needed some "me" time.


My fave, the Heidi Klum. Even my boobs feel bigger with this one, nein?

The Demi scared me. I felt a bit pinheaded too. Super straight and I don't mix. I dyed my hair black in highschool and never did it again.

"Hey kids, who needs a ride to soccer?"

I highlight the crap out of my hair normally, but this might be a bit much.


This freaked me out because I looked so much like my sister K.K....
See?... Not that thats a bad thing.


Yeah, no.

And finally bangs... SO wish I could rock them, but this do makes me feel like I should churn some butter and sew a flag...

I did find a better site  here that lets you try more styles out and wont constantly try to get you to upgrade. Or go here if you like that kind of harassment and try the above dos.  Now go kill time and make your own montage.
Happy timesuck people! 
xo

Bri, this one is for you...

Bri, the goddess from You, Me and a Wiener suggested I post pictures of the other mirrors I was considering for the boys room.  I thought that was an extra fabulous idea because I haven't an original post idea for you today.  Thank you Bri, xxoo. 
I have one kid home sick who was up coughing all night, so I am extra dumb today and I'm starting to get their cold too.
OK, so  I love the Pagodas, but they are feeling a bit fancy pants in the space so I swapped a pair from my bedroom. The only reason(s) I didn't do this to start with is because I plan on adding the matching Pagoda headboard to my room and didn't want it to be all matchy match. Also the white pagoda mirrors were doing magically delicious things to my brain against those blue walls. My bedroom is plain light beige.
So here they are... Camera 1:

Bri, please note the wieners.
Camera 2:


Thoughts, feelings, emotions?

Oh, I found the same mirrors on Pieces for $1285 for the pair. Have I told you how much I love thrift shops and yards sales lately? Seriously go hit some. I got mine back before I had kids for less than $20 for the pair.

Speaking of children, I had my meanest critic yesterday.  Shortly after I posted their room, Thomas got his Under-Roos all in a bunch and decided he hated everything and it all had to go. I told him if we were on a design show the host would be crying.  Turned out he had a low grade fever and was hungry. I still feel sorry for his future spouse though. 
And Joe is not impressed with his work space. He still likes the kitchen table.
 Oh well.
I'm off to play nurse, attack this pile

which keeps growing because of "Mr. I need to change my clothes every hour because it has a drop of water on it or I need a green shirt",

 and try to get nap time to happen so I can catch up on some work.
  Ah, Mother's Day. You were too short.
Have a good one folks. And I am always open to post suggestions too;)

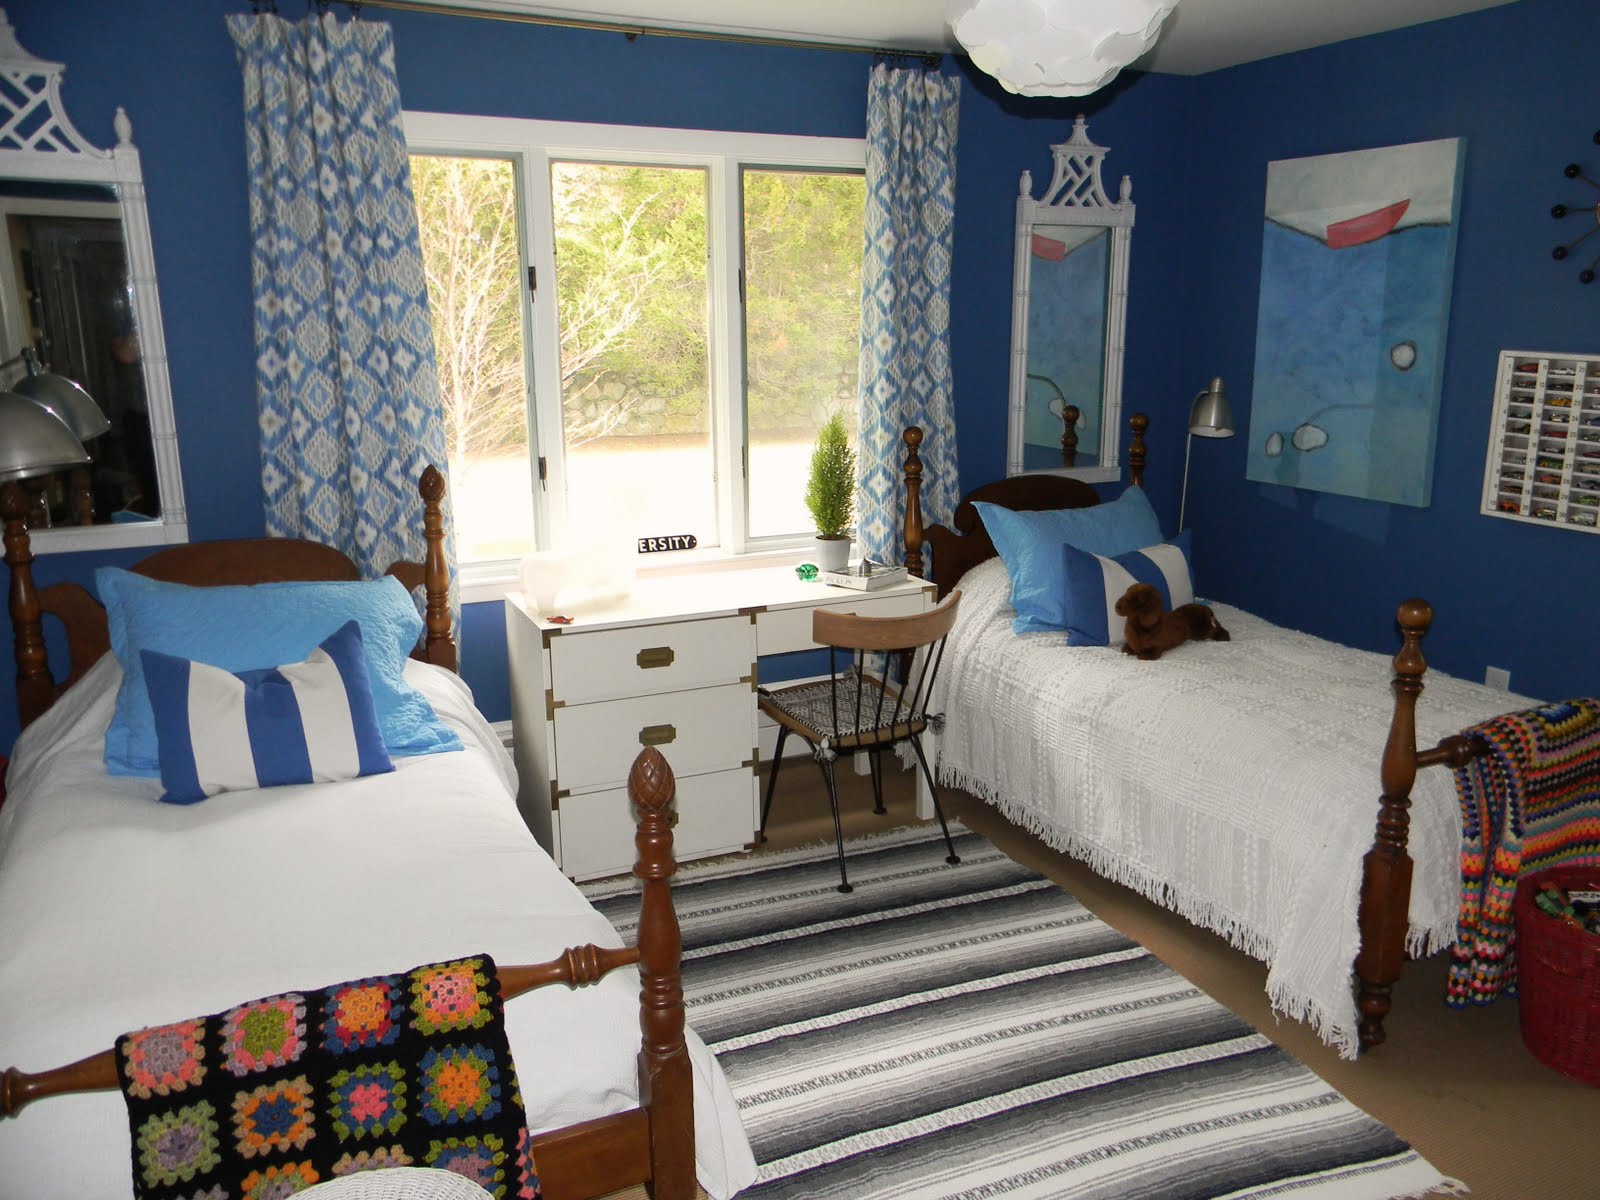
The Boy's Room- Kind of an After


So I spent my Mother's Day wrapping up a few projects around here.  Mainly painting the boy's bedroom blue and building their desk.  I also temporarily solved their rug dilema today. I had an old Mexican beach blanket that I had picked up for $2 and decided to use it as a floor mat.
Looks dhurrie-ish...
Oh, P.S., I washed the blanket and then threw it in the dryer not knowing the white stripes were wool, so I spent an hour wetting and streching it back. You will notice its no longer square.


Here is the before. I did a post on my original plans for it here.

I used the mirrors and night tables from my Pagoda set, questioning if the mirrors are too frou frou for them though.  I have another pair in my room that are more simple that I might switch out.

My oldest  wanted blue, so I went off from the drapes and did Ben Moore Chicago Blues.

 I switched their beds for a pair that were mine from my childhood. Was going to paint them black, but I really liked the wood.

Sorry for the crapola photos, something is wrong with my camera and its resolution. I had to shoot quickly because the kids kept coming in and jumping on the beds. Safe to say this room looks nothing like this now.


I had two old afghans, one made by my great grandmother, and old white bedspreads too that got recycled. 

The afghans look great with the desk wall across the room covered in old Massachusetts Registration signs.  I painted the nightstands black and cut a piece of plywood for the top.  I then wrapped it in a striped wallpaper remnant and had a piece of plexiglass cut for the top. The nightstand hide all their toys and clutter.

This is Thomas' work station. He loves to draw, and being a creative person I know how awesome it feels to have a space to work at.  Joe uses the Campaign desk between the beds for his space, but he is only 3 and doesn't sit still for long.


I recovered an old foot stool, and added this swag pendant I picked up when I was down at my parent's last month.  Can't decide if I like the light here, or if I want to paint it a different color.  My gut is telling me they are going to try to swing on it.


What do you think? Keep it, paint it or edit it out?

TGI Saturday!

Happy Weekend! Despite the fact that the weather here can't make up its mind if its going to rain or shine, I am so excited for a little down time. I have lots of projects to finish up here on the home front, and look forward to hanging with the fam and freinds tomorrow (and if it isn't pouring maybe hitting a fleamarket).

I also want to give a few more big shouts out of thanks to  Isabella & Max , You Paid More Than Me and The Mustard Ceiling for featuring my recent mural. If I missed you please email me! And if I owe you an email back I haven't forgotten you, its just I'm not used to having such a busy inbox.  All your sweet comments have really made my month!  I love designing and doing, and it feels really cool to have such great responses to my projects. 

Speaking of projects, Sidney over at Eclectic is featuring my malachite lamp DIY today in her Before and After series.

 Have you been to her blog yet? I love her style and her penchant to mix it a bit of vintage for personality.  She has a clean beachy feel and is also an organizer, so jealous of that ability! Look how pretty her work is...


What I really love is her shop Eclectic Finds. Check out some of the goodies she has for sale...
love these handpainted burlap pillows, so summery

Metro letters

this is now sold, but couldn't resist, this stool is one of my all time favorite designs

Pop over and say "Hi" to Sidney this weekend,
and to all you Mamas out there... have a fabulous day!
Anyone doing anything interesting?
xo
Danika

How To: Faux Malachite

No video today, I'm feeling a little under the weather. Sorry. But I do have a step by step how to on  Faux Malachite. I know I was going to do Tortoise Shell, and I will, but  I feel crappy and malachite lamps just sounded better.  So lets get started.
First go find something to turn into stone, I had these "totally awesome" 80's lamps with super cheap lacquered brass.
But you can do it on anything, check these chairs I saw on Parlour the other day...


If I had a pair kicking around, I would have done them too. For now, back to the lamp...
Base coat with a pale blue/green. I only needed a small amount so I picked up a tester of Glidden's G14- Almost Aqua for $1.99.

Next mix 3 parts glaze with 1 part paint. The paint needs to be a deep emerald green, similar to Ben Moore's 2049-10 pacific sea teal or 2051-10 yukon green. Do a test patch. You may want to add some black to darken, or tint it in either direction with blue or yellow to your liking.

Start by brushing on an area, and quickly removing it with torn pieces of cardboard. Practice this technique first before heading straight to your project. You'll want to look at some malachite and mimic the wiggly curves. You can also use a fan brush for this technique. ( I just couldn't find mine.)

Keep painting more glaze on and removing...

Next you'll want to soften the hard lines and thick edges. Using a brush, lightly stipple or tap the surface to flatten and soften...

Let it dry. I wasn't thrilled with mine, so I lightly rubbed some green glaze over the whole lamp to deepen it a bit.  Next coat with a high gloss varnish. I gave mine 2 coats of a spray lacquer.


A little trick to tone down cheap laquered brass...
I use this product. I just brush a little on, and stipple it out to give it more of an antiqued gilt look.

And that is it. Just one more lamp to go and my entrance has a new set of lights.
Not sure about the shades though, they might need a makeover too.

I'll be back when I feel a little better.
Have a great rest of the weekend.


LinkWithin

Related Posts with Thumbnails